
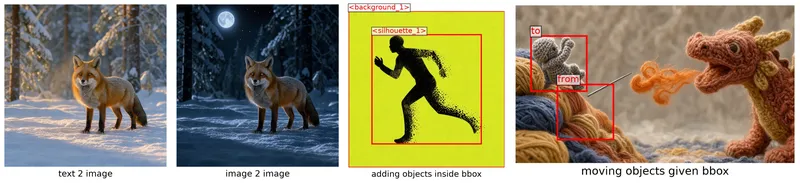
Black Forest Labs FLUX.3 Image Kleinが登場しました。初日からDiffusersで動作します。1つのモデルでテキストから画像への生成と、複数参照画像からの画像生成の両方に対応し、さらに新しい機能として、 レイアウト制御。画像の各部分をどこに配置するか、または参照画像のどの部分を移動するかを指定するために、バウンディングボックスをプロンプトに書き込みます。
両方のオープンなチェックポイントは FLUX.3 Image Klein コレクション:
| チェックポイント | それは何か | デフォルト |
|---|---|---|
black-forest-labs/flux-3-image-klein |
タイムステップを蒸留し、高速な推論を実現 | 16ステップ、CFGなし |
black-forest-labs/flux-3-image-klein-base |
ベースモデル | 50ステップ、CFG |

以下にアクセスできます: Hugging Faceスペース 今すぐいくつかの画像を生成してみましょう!
要約
- テキストから画像への生成、複数参照画像からの画像生成、バウンディングボックスによるレイアウト制御を1つのモデルで実現します。
- 蒸留されたチェックポイントは、1024 × 1024の画像を約 2秒 H100上で。
- NVFP4およびFP8の重みは以下で読み込まれます
from_single_file, より小型のGPU向けです。 - テキストから画像への生成と画像編集の両方に対応したLoRAトレーニングスクリプト。
- 以下として出荷: Modular Diffusers パイプラインなので、ブロックを取り外したり独自のものを追加したりできます。
目次
はじめに
最新版のインストール diffusers と transformers (Qwen3-VLテキストエンコーダー用):
pip install -U diffusers transformers
蒸留チェックポイントを読み込んで画像を生成します:
import torch
from diffusers import ModularPipeline

pipe = ModularPipeline.from_pretrained("black-forest-labs/flux-3-image-klein")
pipe.load_components(dtype=torch.bfloat16)
pipe.to("cuda")

pipe(prompt="a red fox", output="images")[0].save("fox.png")
FLUX.3にできること
テキストから画像生成(Text-to-image)
FLUX.3は、被写体、背景、光、構図、スタイルを含んだ完全なシーンの説明に最もよく応答します。この 公式プロンプティングガイド Black Forest Labsからのモデルにはさらにヒントがあります。蒸留チェックポイントは 1024 × 1024 画像の入力 16 ステップがデフォルトです。Pass height, width、または num_inference_steps 「それらを変更すること。」
prompt = (
    "A wide-angle wildlife photograph of a red fox standing alert in a snow-covered forest clearing at golden hour. "
    "The fox is centered in the frame, its thick orange winter coat contrasting with the fresh white snow, breath "
    "visible in the cold air. Snow-laden pine trees fill the softly blurred background, and low warm sunlight rakes "
    "across the scene from the left, casting long blue shadows."
)

fox = pipe(
    prompt=prompt,
    generator=torch.Generator().manual_seed(0),
    output="images"
)[0]
fox.save("fox.png")
 |
|---|
| テキストから画像生成 |
画像から画像へ(Image-to-image)
参照画像を1枚以上、次のものと共に渡します image 引数。プロンプトは、その変更を含めた、あなたが したい画像のキャプションとして書いてください。画像から画像へ
prompt = (
    "The same red fox in the same snow-covered forest clearing, now at night under a full moon: cool blue "
    "moonlight, deep shadows, stars visible through the pine branches, the fox's eyes catching the light."
)
night = pipe(
    prompt=prompt,
    image=fox, # from the previous text to image example
    generator=torch.Generator().manual_seed(0),
    output="images",
)[0]
night.save("night.png")
 |
|---|
| 複数の参照画像がある場合は、プロンプト内でそれらを、 |
に渡された順番で <ref_image_0>, <ref_image_1>: a red fox image:
red_fox = pipe(prompt="a red fox", generator=torch.Generator().manual_seed(0), output="images")[0]
bench = pipe(prompt="a wooden bench", generator=torch.Generator().manual_seed(0), output="images")[0]

combined = pipe(
    prompt="The fox from <ref_image_0> sitting on the wooden bench from <ref_image_1> in a snowy setting.",
    image=[red_fox, bench],
    output="images",
)[0]

combined.save("combined.png")
 |
 |
 |
|---|---|---|
<ref_image_0>: a wooden bench |
<ref_image_1>The fox on the bench |
レイアウト制御 |
キャプションの後に、リージョンの JSON リストを追加します。各リージョンには
と idと bboxがあり、キャプションでは descとして言及されます。 <id>.
ボックスは
[y_min, x_min, y_max, x_max], を先に、0–1000 のスケールで記述します。スケールは正規化されているため、同じボックスがどの画像サイズでも機能します。
新しい画像へのリージョンの配置
layout_prompt = (
    "Minimalist graphic illustration featuring a black silhouette of a person <silhouette_1> centered against a "
    "solid, vibrant chartreuse background <background_1>. The figure is captured in a dynamic, mid-stride running "
    "pose, facing toward the left side of the frame. "
    '[{"id": "background_1", "bbox": [0, 0, 1000, 1000], "desc": "A flat field of neon yellow-green with a subtle '
    'paper texture and fine, organic grain."}, {"id": "silhouette_1", "bbox": [150, 150, 850, 850], "desc": "A '
    "black silhouette of a person in motion, made of dense stippled ink. The leading edges are solid; the trailing "
    'arm and leg dissolve into coarse square pixels and scattered dots."}]'
)

runner = pipe(prompt=layout_prompt, generator=torch.Generator().manual_seed(0), output="images")[0]
 |
|---|
各リージョンの desc はその bbox |
参照画像内でリージョンを移動する
編集では、各リージョンはそのコンテンツがどこから来るか( 参照内)とどこへ行くか( (src_bbox 出力内)を示します。同じ2つのボックスを持つリージョンはその場に留まります。tgt_bbox この例では、ニットの騎士を左上に移動し、背景、崖、針、ドラゴン、炎を固定しています:
この例では、ニットの騎士を上と左に移動させ、背景、崖、針、ドラゴン、そして炎をピン留めしています:
from diffusers.utils import load_image

knight_image = load_image("knight_orig.png")
edit_prompt = (
    "In <ref_image_0>, move the miniature grey amigurumi knight figure <knight_1> upwards and to the left along the "
    "yarn cliff <cliff_1>. Keep the rest of the image completely unchanged, preserving the blurred yarn backdrop "
    "<backdrop_1>, the large knitted dragon <dragon_1>, and the fiery orange thread <fire_1>. "
    '[{"id": "knight_1", "from": "ref_image_0", "src_bbox": [500, 150, 850, 350], "tgt_bbox": [194, 55, 544, 255], '
    '"desc": "A miniature amigurumi knight crocheted from thick grey woolen yarn."}, '
    '{"id": "backdrop_1", "from": "ref_image_0", "src_bbox": [0, 0, 1000, 1000], "tgt_bbox": [0, 0, 1000, 1000], '
    '"desc": "A soft, out-of-focus backdrop of cream and indigo knitted yarn."}, '
    '{"id": "cliff_1", "from": "ref_image_0", "src_bbox": [300, 0, 1000, 450], "tgt_bbox": [300, 0, 1000, 450], '
    '"desc": "A steep cliff of stacked yarn skeins in mustard, terracotta, and indigo."}, '
    '{"id": "needle_1", "from": "ref_image_0", "src_bbox": [420, 250, 550, 450], "tgt_bbox": [420, 250, 550, 450], '
    '"desc": "An oversized polished steel tapestry needle."}, '
    '{"id": "dragon_1", "from": "ref_image_0", "src_bbox": [100, 600, 950, 1000], "tgt_bbox": [100, 600, 950, 1000], '
    '"desc": "A large, fluffy knitted dragon in terracotta and mustard yarn."}, '
    '{"id": "fire_1", "from": "ref_image_0", "src_bbox": [350, 400, 650, 650], "tgt_bbox": [350, 400, 650, 650], '
    '"desc": "Curled puffs of fiery orange angora thread suspended in mid-air."}]'
)

moved = pipe(prompt=edit_prompt, image=knight_image, generator=torch.Generator().manual_seed(0), output="images")[0]
 |
|---|
から src_bbox へ移動し、シーンの他の部分はそのままです tgt_bboxベースモデルと量子化バリアント |
ベースモデル
上記のすべては蒸留チェックポイントを使用しています。ベースチェックポイントはclassifier-free guidance付きで50ステップ実行され、ファインチューニングに使うものです(
上記のすべては蒸留チェックポイントを使用しています。ベースチェックポイントはclassifier-free guidance付きで50ステップ実行しますが、ファインチューニングするのはこちらです(参照: 参照)。シングルファイル形式のチェックポイント).
pipe = ModularPipeline.from_pretrained("black-forest-labs/flux-3-image-klein-base")
pipe.load_components(dtype={"vae": torch.float32, "default": torch.bfloat16})
pipe.to("cuda")

pipe.guider = pipe.guider.new(guidance_scale=5.0)  # optional
image = pipe(prompt=prompt, output="images")[0]
Black Forest Labsはtransformerを単一ファイルでも提供しており、
形式と、2つの量子化形式: bf16 (rowwise FP8)と fp8r (rowwise FP8)と nvfp4でロードし、bf16のtransformerまでダウンロードされないよう、他のコンポーネントは名前指定でロードしてください。 from_single_file、その後、他のコンポーネントを名前でロードして、bf16トランスフォーマーがダウンロードされないようにします。
from diffusers import BFLQuantizationConfig, Flux3Transformer2DModel, ModularPipeline

model_id = "black-forest-labs/flux-3-image-klein-base"
variant = "fp8r"  # or "nvfp4"

transformer = Flux3Transformer2DModel.from_single_file(
    f"https://huggingface.co/{model_id}/blob/main/variants/{variant}/model.safetensors",
    config=model_id,
    subfolder="transformer",
    quantization_config=BFLQuantizationConfig(compute_dtype=torch.bfloat16),
    dtype=torch.bfloat16,
)

pipe = ModularPipeline.from_pretrained(model_id)
pipe.load_components(dtype=torch.bfloat16)
pipe.update_components(transformer=transformer)
pipe.to("cuda")
を使用し、 https://huggingface.co/{model_id}/blob/main/model.safetensors を省きます quantization_config.
| バリアント | 高速カーネル対応 | その他のGPU |
|---|---|---|
fp8r |
コンピュートCapability 8.9以上(Ada、Hopper、Blackwell) | 重みは各ステップで非量子化されます:低メモリ、速度向上なし |
nvfp4 |
Blackwell、 flashinfer-python および flashinfer-cubin 同じバージョンで |
上記と同じ |
LoRAファインチューニング
FLUX.3はtext-to-imageとimage-to-imageの両方に対応しており、カスタムLoRAの優れたベースとなります。 diffusers 両タスク向けの DreamBooth LoRA 学習スクリプトが提供されました(以下を使って学習することもできます: Ostris' AI Toolkit).
タロットカードのスタイルを学習するテキストから画像を生成する例を以下に示します。 multimodalart/1920-raider-waite-tarot-public-domain 「データセット、トリガー条件:」 trtcrd:
accelerate launch train_dreambooth_lora_flux3_klein.py \
  --pretrained_model_name_or_path="black-forest-labs/flux-3-image-klein-base" \
  --dataset_name="multimodalart/1920-raider-waite-tarot-public-domain" \
  --caption_column="caption" \
  --instance_prompt="trtcrd" \
  --output_dir="trained-flux3-tarot-lora" \
  --mixed_precision="bf16" \
  --resolution=1024 \
  --use_aspect_ratio_buckets \
  --train_batch_size=1 \
  --rank=16 \
  --lora_alpha=16 \
  --learning_rate=1e-4 \
  --lr_scheduler="constant" \
  --max_train_steps=1500 \
  --validation_prompt="a trtcrd of a cat, tarot style" \
  --validation_epochs=25 \
  --seed=0 \
  --push_to_hub
メモリ使用量を削減するために、いくつかの最適化フラグを追加します:
  --gradient_checkpointing \
  --cache_latents \
  --use_8bit_adam
--gradient_checkpointing逆伝播時に活性化を再計算します(VRAM使用量は低減、速度はやや低下)。--cache_latents画像を事前にエンコードしてVAEを解放します。さらに、--use_8bit_adamオプティマイザの状態を 8 ビットで保持します。
いくつかのパラメータを試してみる価値があります。下のグリッドは、同じタロットスタイルを異なるLoRAランクとオプティマイザで学習させたもので、アダプタはHubで公開されています: diffusers-modular/flux3-tarot-lora。その他のトレーニング機能と設定については、次のドキュメントに記載されています。 DreamBooth FLUX.3 README.

指示ベースの編集については、image-to-image スクリプト(train_dreambooth_lora_flux3_klein_img2img.py`) trains on (reference image, target image, instruction) triplets, where the reference is addressed in the prompt as` → `)は(参照画像、ターゲット画像、指示)のトリプレットで学習し、参照画像はプロンプト内で次のように呼ばれる:` <ref_image_0>.
以下を参照してください DreamBooth FLUX.3 README すべてのオプションと完全なimage-to-imageの例については、をご覧ください。
運営にかかるコスト
このセクションでは、モデルのメモリ消費量と生成速度について説明します。
メモリ
| 名前 | 読み込み後の最大割り当て量(GiB) | 推論後のピーク割り当てメモリ(GiB) |
|---|---|---|
| nvfp4(RTX6000) | 13.4 | 15.3 |
| fp8r(H100) | 14.35 | 16.27 |
| bf16(H100) | 18.80 | 20.72 |
メモリが少ない場合:
- を読み込む 量子化されたトランスフォーマー.
- テキストエンコーダーを別途実行してから解放します。これは画像ごとに1回、デノイジングの前にのみ実行されます(参照: 一度エンコードし、何度も生成する).
- 自動CPUオフロードを有効にします。これにより、各コンポーネントは実行中のみGPUに移されます(今回ベンチマークは行っていません)
from diffusers import ComponentsManager, ModularPipeline

manager = ComponentsManager()
manager.enable_auto_cpu_offload(device="cuda")

pipe = ModularPipeline.from_pretrained("black-forest-labs/flux-3-image-klein", components_manager=manager)
pipe.load_components(dtype={"vae": torch.float32, "default": torch.bfloat16})
# no pipe.to("cuda"): the manager handles device placement
速度
蒸留チェックポイント(16ステップ)のエンドツーエンドの処理時間。ウォームアップ後の3回の実行の平均値です:
| ワークフロー | 出力サイズ | 時間 | ピークメモリ |
|---|---|---|---|
| テキストから画像へ | 1024 × 1024 | 1.93 秒 | 23.8 GiB |
| 画像から画像への変換、1024 × 1024の参照画像1枚 | 1024 × 1024 | 3.87秒 | 23.8 GiB |
| レイアウト編集(ナイト)、1360 × 768の参考画像1点 | 1360 × 768 | 4.10秒 | 23.8 GiB |
NVIDIA H100 80GB 1基、オフロードなし、デフォルトのattentionバックエンド。
参照画像があると時間はおよそ2倍になります。参照トークンは、生成対象のテキストや画像と同じシーケンスに結合されるため、1024 × 1024 の参照画像はトランスフォーマーの各呼び出しに4,096トークンを追加します
 |
|---|
| トランスフォーマー呼び出しごとのトークン数の積み上げ棒グラフ:text-to-image 4,256 トークン、image-to-image 8,272、layout text-to-image 4,336、layout image-to-image 8,800 |
アーキテクチャ
モデルを一つずつ分解して開いていきましょう。このモデルは3種類のトークンを受け取ります。
- テキスト
- および ノイズ画像 生成中
- とオプションの 参照画像
ピクセルからトークンへ
FLUX.3は画像生成用の潜在空間フローモデルです。つまり、デノイザーは潜在変数を入力として受け取り、潜在変数を出力します。VAEを使って潜在変数をピクセルに戻してデコードします。FLUX.3はFlux.2と同じVAEアーキテクチャを使用します。
FLUX.2のVAEは画像を各方向に8倍に圧縮して32チャンネルにし、その潜在表現の2 × 2の各パッチを128チャンネルの単一トークンにパックします。
したがって 1つのトークンが16 × 16ピクセルのパッチをカバーし1024 × 1024の画像は4,096個のトークンからなる64 × 64のグリッドになります。ノイズ画像は、まさにこの形状のランダムノイズとして始まります。参照画像は同じVAEエンコーダーとパッキングを経由し、独自のサイズを保ちます。
プロンプトからトークンへ
テキストエンコーダーは、ビジョン・言語モデルであるQwen3-VLです。FLUX.3は最終層だけを使うのではなく、36層のうち 8層 その36層の中から(層4、8、…、32)の隠れ状態を読み取って積み重ねます。これにより、線形層がトランスフォーマーの幅である3072に射影する前に、各テキストトークンは8 × 2560 = 20,480次元のベクトルになります。
これにより、トランスフォーマーは最終層だけでなく、言語モデルの複数の深さからの特徴を得られます。プロンプトは80トークンの倍数にパディングされ、トランスフォーマーはパディングにも注意を払うため、パイプラインは1回の呼び出しにつき1つのプロンプトを受け付けます。
2つのステージ
トランスフォーマーはトークンを2つのステージで処理します:
- ステージ1: モードごとのブロック。 各ストリームは、それぞれ独自の重みを持つ5つのブロックを通過します。テキストにはテキスト専用のブロック、ノイズ付き画像には専用のブロック、参照画像には専用のブロックがあります。
- ステージ2: ジョイントブロック。 ストリームは1つのシーケンスに連結され、
[text | image | reference]そのシーケンスは1組の重みを共有する28のブロックを通過します。
2つのステージが異なるのは 誰が誰に注意を向けられるかという点です。.
ステージ1では、各ストリームは自分自身にのみ注意を向けるため、各種トークンはまずそれぞれのやり方で個別に精錬されます。ステージ2では、すべてがすべてに注意を向け、画像がテキストから、また参照から学習します。比較として、FLUX.2 のダブルストリームブロックもテキストと画像に別々の重みを与えますが、最初から互いに注意を向け合えます。FLUX.3 ではまずストリームを完全に分けておき、その後に統合します。
最後に、テキストトークンと参照トークンは単に破棄されます。画像トークンだけが出力層を通過し、そこでクリーンな画像へ1ステップ近づけるための移動方法が予測されます。
1つのブロックの内部
どちらのステージのブロックも同じ構造をしています。Attention と MLP は 並列に 同じ正規化済み入力に対して実行され、その合計が残差ストリームに加算されます。
各ブロックは、学習済みのスケールやシフトを持たない LayerNorm から始まります。スケール、シフト、ゲートは代わりにタイムステップ埋め込みから供給されます(これは modulationと呼ばれます)。Attention の内部では、クエリとキーが RMS 正規化され、回転位置埋め込み(RoPE)が適用されます。これについては後述します。
ジョイントブロックでは、すべてのトークンが同じ重みを共有しますが、テキスト、画像、参照の各トークンはそれぞれ固有のスケール、シフト、ゲートを持ちます。
def block(x, shift, scale, gate):      # shift, scale, gate come from the token's timestep embedding
    h = layer_norm(x)                  # no learned scale or shift
    h = (1 + scale) * h + shift
    q, k, v = to_q(h), to_k(h), to_v(h)
    q, k = rope(rms_norm(q)), rope(rms_norm(k))
    out = attention(q, k, v) + mlp(h)  # parallel, MLP is SwiGLU
    return x + gate * out
すべてのトークンがそれぞれ固有のタイムステップを持つ
FLUX.1およびFLUX.2では、1つのタイムステップ埋め込みがすべてのトークンを変調します。FLUX.3では、変調はトークンの種類に依存します。
ノイズ付きの画像トークンは現在のタイムステップ tによって変調されます。テキストトークンと参照トークンは常にタイムステップ 0によって変調されます。これは「クリーン、ここには denoise すべきものは何もない」を意味します。つまり、出力とほぼ同じに見える参照であっても、生成すべき対象ではなく与えられた文脈として扱われます。
蒸留されたチェックポイントは フローマップです。また、各ステップがどのタイムステップへジャンプするかも伝えられます。この2つ目のタイムステップは専用の埋め込みを持ち、それはすべてのトークンの変調に加算されるため、16 ステップのそれぞれでより大きなジャンプが可能になります。
4次元の位置
Attention 単体ではトークンがどこにあるかを認識できません(この現象は置換同変性と呼ばれます)。RoPE は、トークンの位置に応じた量だけ各クエリとキーを回転させることでこれを解決します。FLUX.3 は4つの位置軸、 (t, h, w, l) (タイムステップ、高さ、幅、系列長)を使用し、それぞれに 128 次元の attention ヘッドの4分の1(32 次元)を割り当てます:
| トークン | t: タイムステップ | h: 高さ | w: 幅 | l: 系列長 |
|---|---|---|---|---|
| テキストトークン i | 0 | 0 | 0 | i |
| 位置 (row, col) の画像トークン | 0 | row / 2 | col / 2 | 0 |
| 参照 k 位置 (row, col) | 0 | row / 2 | col / 2 | −(k + 1) |
テキストトークンは l、文の中の単語のように並びます。画像と参照は2Dグリッドであり、 (h, w)内の2Dグリッドであり、 l. リファレンスは出力と同じ (h, w) 座標を使用するため、「リファレンス内の同じ位置」がモデルにとって明確な意味を持ち、これが src_bbox / tgt_bbox 編集の基盤となっています。
デノイジングループ
FLUX.3はフローマッチングモデルです。生成は純粋なノイズから始まり、50ステップの各ステップでtransformerが velocityを予測します。これはノイズからクリーンな画像に向かう方向です。スケジューラはその方向に沿って1ステップ進めます。
各ステップでは、最終画像に対するモデルの現在の推測も読み取ることができます。いくつかのステップでその推測をデコードすると、画像が形になっていく様子がわかります:
 |
 |
||||
|---|---|---|---|---|---|
| ステップ 1 | ステップ 5 | ステップ 10 | ステップ 15 | ステップ 25 | ステップ 50 |
キツネ、そのポーズ、そして光はステップ10の時点で、ノイズレベルがまだ0.97のうちにすでに配置されています。雪を積もった枝や毛皮の質感は最後の数ステップでしか現れません。FLUX.3のスケジューラは大きなタイムシフト(6.93)を使用しており、実行の大部分でノイズレベルが高く保たれます:50ステップのうち44ステップがσ = 0.5より上で発生します。この図はパイプラインに小さなブロックを1つ追加することで作成しました。これがModular Diffusersにつながります。
フロー・マッチングが初めての方のために、仕組みを理解するための初心者向けチュートリアルと動画をご用意しています。 初心者向けチュートリアル と 動画 をご用意しています。
Modular Diffusers
FLUX.3 は Modular Diffusers パイプラインとして提供されます。
ワークフローを見る
重みを一切読み込まずに、ワークフローの一覧を表示し、それぞれの正確なブロックを出力できます。
from diffusers import Flux3AutoBlocks

blocks = Flux3AutoBlocks()
print(blocks.available_workflows)
# ['text2image', 'image_conditioned']

print(list(blocks.get_workflow("text2image").sub_blocks))
# ['text_encoder', 'denoise.input', 'denoise.prepare_latents', 'denoise.set_timesteps',
#  'denoise.prepare_rope_inputs', 'denoise.denoise', 'denoise.after_denoise', 'decode']
get_workflow() は auto ブランチを解決し、実際に実行される一連のステップをそのままの形で示します。 print(blocks.get_workflow("image_conditioned").doc) はそのワークフローのコンポーネント、入力、デフォルト値、出力を出力します。
1回エンコードして何度も生成
テキストエンコーダーを取り出してプロンプトを一度だけエンコードし、それを解放してから、キャッシュされた埋め込みから生成します。
import torch
from diffusers import ModularPipeline

model_id = "black-forest-labs/flux-3-image-klein-base"

blocks = ModularPipeline.from_pretrained(model_id).blocks
text_blocks = blocks.sub_blocks.pop("text_encoder")  # `blocks` now starts at the VAE encoder

text_pipe = text_blocks.init_pipeline(model_id)
text_pipe.load_components(dtype=torch.bfloat16)
text_pipe.to("cuda")

state = text_pipe(prompt=prompt, negative_prompt="")  # no guider here, so ask for the negative embeddings

prompt_embeds = state.get("prompt_embeds")
negative_prompt_embeds = state.get("negative_prompt_embeds")

del text_pipe
torch.cuda.empty_cache()

image_pipe = blocks.init_pipeline(model_id)  # no text encoder to load
image_pipe.load_components(dtype={"vae": torch.float32, "default": torch.bfloat16})
image_pipe.to("cuda")

for seed in range(3):
    image = image_pipe(
        prompt_embeds=prompt_embeds,
        negative_prompt_embeds=negative_prompt_embeds,
        generator=torch.Generator().manual_seed(seed),
        output="images",
    )[0]
    image.save(f"{seed}.png")
ループ内にステップを追加する
上記のノイズ除去の図は、各ステップにおけるモデルのクリーン画像の推定を記録する、追加のブロック1つから得られたものです:
from diffusers.modular_pipelines import Flux3AutoBlocks, InputParam, ModularPipelineBlocks, OutputParam


class Flux3PreviewStep(ModularPipelineBlocks):
    model_name = "flux3"

    @property
    def inputs(self):
        return [InputParam("latents"), InputParam("noise_pred")]

    @property
    def intermediate_outputs(self):
        return [OutputParam("x0_previews", type_hint=list)]

    @torch.no_grad()
    def __call__(self, components, block_state, i, t):
        if i == 0:
            block_state.x0_previews = []
        sigma = t / 1000  # timesteps are sigmas scaled to [0, 1000]
        block_state.x0_previews.append(block_state.latents - sigma * block_state.noise_pred)  # x0 = x_t - sigma * v
        return components, block_state


blocks = Flux3AutoBlocks()
denoise_loop = blocks.sub_blocks["denoise"].sub_blocks["text2image"].sub_blocks["denoise"]
denoise_loop.sub_blocks.insert("preview", Flux3PreviewStep(), 1)  # between "denoiser" and "after_denoiser"

pipe = blocks.init_pipeline(model_id)
pipe.load_components(dtype={"vae": torch.float32, "default": torch.bfloat16})
pipe.to("cuda")

out = pipe(prompt=prompt, generator=torch.Generator().manual_seed(0), output=["x0_previews", "images"])
試してみる
- モデル: FLUX.3 Image Klein コレクション
- ドキュメント: Diffusers における FLUX.3
- ファインチューニング: DreamBooth LoRA スクリプト
- プロンプト作成: Black Forest Labs プロンプティングガイド
FLUX.3 で何かを作りましたか?LoRA やパイプラインを Hub でぜひ共有してください。楽しみにしています!😎