
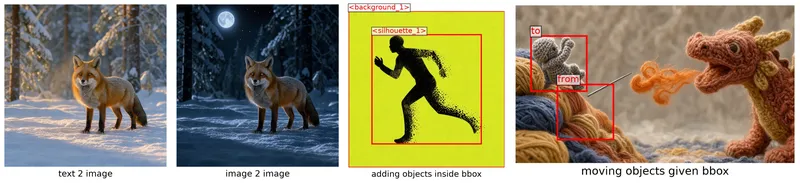
Black Forest Labs FLUX.3 Image Klein가 출시되었으며, 첫날부터 Diffusers에서 실행할 수 있습니다. 하나의 모델이 text-to-image와 multi-reference image-to-image를 모두 수행하고, 새로운 기능인 레이아웃 컨트롤. 이미지의 각 부분이 어디에 위치해야 하는지, 또는 참조 이미지의 어떤 부분을 이동할지 지정하려면 프롬프트에 바운딩 박스를 작성합니다.
두 개의 공개 체크포인트는 모두 FLUX.3 Image Klein 컬렉션:
| 체크포인트 | 그것이 무엇인가 | 기본값 |
|---|---|---|
black-forest-labs/flux-3-image-klein |
빠른 추론을 위한 타임 스텝 증류 | 16단계, CFG 없음 |
black-forest-labs/flux-3-image-klein-base |
기본 모델 | 50 steps, CFG |

당신은 다음으로 이동할 수 있습니다 Hugging Face 스페이스 지금 바로 이미지를 생성해 보세요!
요약
- 텍스트-이미지, 다중 참조 이미지-이미지, 바운딩 박스 레이아웃 제어를 위한 하나의 모델입니다.
- 증류된 체크포인트는 약 다음 시간 안에 1024 × 1024 이미지를 생성합니다. 2초 H100에서.
- NVFP4 및 FP8 가중치는 다음과 함께 로드됩니다
from_single_file, 저사양 GPU용. - 텍스트-이미지 생성(text-to-image)과 이미지 편집 모두를 위한 LoRA 학습 스크립트입니다.
- 배송 형태: 모듈형 Diffusers 파이프라인이라 블록을 빼내거나 직접 추가할 수 있습니다.
목차
시작하기
최신 버전 설치 diffusers 그리고 transformers (Qwen3-VL 텍스트 인코더용):
pip install -U diffusers transformers
증류된 체크포인트를 로드하고 이미지를 생성합니다:
import torch
from diffusers import ModularPipeline

pipe = ModularPipeline.from_pretrained("black-forest-labs/flux-3-image-klein")
pipe.load_components(dtype=torch.bfloat16)
pipe.to("cuda")

pipe(prompt="a red fox", output="images")[0].save("fox.png")
FLUX.3이 할 수 있는 일
텍스트-이미지 변환
FLUX.3는 피사체, 배경, 조명, 구도, 스타일을 모두 포함한 완전한 장면 묘사에 가장 잘 반응합니다. 이 공식 프롬프팅 가이드 Black Forest Labs의 모델에 대한 추가 팁이 있습니다. 증류된 체크포인트는 a를 생성합니다. 1024 × 1024 이미지 입력 16 단계를 기본값으로 사용합니다. Pass height, width, 또는 num_inference_steps 변경하기 위한 것입니다.
prompt = (
    "A wide-angle wildlife photograph of a red fox standing alert in a snow-covered forest clearing at golden hour. "
    "The fox is centered in the frame, its thick orange winter coat contrasting with the fresh white snow, breath "
    "visible in the cold air. Snow-laden pine trees fill the softly blurred background, and low warm sunlight rakes "
    "across the scene from the left, casting long blue shadows."
)

fox = pipe(
    prompt=prompt,
    generator=torch.Generator().manual_seed(0),
    output="images"
)[0]
fox.save("fox.png")
 |
|---|
| 텍스트-이미지 |
이미지 대 이미지
다음과 함께 참조 이미지(하나 이상)를 전달하세요: image 논쟁. 프롬프트를 당신이 보고 있는 이미지의 캡션으로 작성하십시오. 원하다, 해당 변경 사항이 포함된 상태로.
prompt = (
    "The same red fox in the same snow-covered forest clearing, now at night under a full moon: cool blue "
    "moonlight, deep shadows, stars visible through the pine branches, the fox's eyes catching the light."
)
night = pipe(
    prompt=prompt,
    image=fox, # from the previous text to image example
    generator=torch.Generator().manual_seed(0),
    output="images",
)[0]
night.save("night.png")
 |
|---|
| 이미지에서 이미지로 |
여러 개의 참조 자료가 있는 경우, 프롬프트에서 다음과 같이 지칭하십시오. <ref_image_0>, <ref_image_1>, ... 전달되는 순서대로 image:
red_fox = pipe(prompt="a red fox", generator=torch.Generator().manual_seed(0), output="images")[0]
bench = pipe(prompt="a wooden bench", generator=torch.Generator().manual_seed(0), output="images")[0]

combined = pipe(
    prompt="The fox from <ref_image_0> sitting on the wooden bench from <ref_image_1> in a snowy setting.",
    image=[red_fox, bench],
    output="images",
)[0]

combined.save("combined.png")
 |
 |
 |
|---|---|---|
<ref_image_0>: 붉은여우 |
<ref_image_1>: 나무 벤치 |
벤치 위의 여우 |
레이아웃 제어
캡션 뒤에 지역(region) 목록을 JSON 리스트로 추가합니다. 각 지역에는 다음 항목이 있습니다. id, 이는 bbox, 그리고 desc, 그리고 캡션에서는 그것을 다음과 같이 언급합니다 <id>.
박스는 다음과 같이 작성됩니다
[y_min, x_min, y_max, x_max], 내 첫, 0–1000 척도로 표시됩니다. 척도가 정규화되어 있기 때문에 동일한 박스가 어떤 이미지 크기에서도 작동합니다.
새 이미지에 영역 배치
layout_prompt = (
    "Minimalist graphic illustration featuring a black silhouette of a person <silhouette_1> centered against a "
    "solid, vibrant chartreuse background <background_1>. The figure is captured in a dynamic, mid-stride running "
    "pose, facing toward the left side of the frame. "
    '[{"id": "background_1", "bbox": [0, 0, 1000, 1000], "desc": "A flat field of neon yellow-green with a subtle '
    'paper texture and fine, organic grain."}, {"id": "silhouette_1", "bbox": [150, 150, 850, 850], "desc": "A '
    "black silhouette of a person in motion, made of dense stippled ink. The leading edges are solid; the trailing "
    'arm and leg dissolve into coarse square pixels and scattered dots."}]'
)

runner = pipe(prompt=layout_prompt, generator=torch.Generator().manual_seed(0), output="images")[0]
 |
|---|
각 지역의 desc 자신의 내부에 그려진다 bbox |
참조 이미지 내에서 영역 이동하기
편집의 경우, 각 영역은 해당 콘텐츠가 어디에서 왔는지 말합니다 부터 (src_bbox 참고 문헌에 나타나는) 그리고 그것이 어디로 가는지(tgt_bbox (출력에서). 동일한 두 상자를 가진 영역은 제자리에 유지됩니다.
이 예제에서는 뜨개질한 기사를 위와 왼쪽으로 움직이고, 배경, 절벽, 바늘, 용, 불은 고정합니다:
from diffusers.utils import load_image

knight_image = load_image("knight_orig.png")
edit_prompt = (
    "In <ref_image_0>, move the miniature grey amigurumi knight figure <knight_1> upwards and to the left along the "
    "yarn cliff <cliff_1>. Keep the rest of the image completely unchanged, preserving the blurred yarn backdrop "
    "<backdrop_1>, the large knitted dragon <dragon_1>, and the fiery orange thread <fire_1>. "
    '[{"id": "knight_1", "from": "ref_image_0", "src_bbox": [500, 150, 850, 350], "tgt_bbox": [194, 55, 544, 255], '
    '"desc": "A miniature amigurumi knight crocheted from thick grey woolen yarn."}, '
    '{"id": "backdrop_1", "from": "ref_image_0", "src_bbox": [0, 0, 1000, 1000], "tgt_bbox": [0, 0, 1000, 1000], '
    '"desc": "A soft, out-of-focus backdrop of cream and indigo knitted yarn."}, '
    '{"id": "cliff_1", "from": "ref_image_0", "src_bbox": [300, 0, 1000, 450], "tgt_bbox": [300, 0, 1000, 450], '
    '"desc": "A steep cliff of stacked yarn skeins in mustard, terracotta, and indigo."}, '
    '{"id": "needle_1", "from": "ref_image_0", "src_bbox": [420, 250, 550, 450], "tgt_bbox": [420, 250, 550, 450], '
    '"desc": "An oversized polished steel tapestry needle."}, '
    '{"id": "dragon_1", "from": "ref_image_0", "src_bbox": [100, 600, 950, 1000], "tgt_bbox": [100, 600, 950, 1000], '
    '"desc": "A large, fluffy knitted dragon in terracotta and mustard yarn."}, '
    '{"id": "fire_1", "from": "ref_image_0", "src_bbox": [350, 400, 650, 650], "tgt_bbox": [350, 400, 650, 650], '
    '"desc": "Curled puffs of fiery orange angora thread suspended in mid-air."}]'
)

moved = pipe(prompt=edit_prompt, image=knight_image, generator=torch.Generator().manual_seed(0), output="images")[0]
 |
|---|
나이트는 자신의 위치에서 이동합니다. src_bbox 그 자체에 대한 tgt_bbox, 그리고 장면의 나머지 부분은 그대로 유지됩니다 |
베이스 모델 및 양자화 변형 모델
기본 모델
위의 모든 내용은 증류(distilled) 체크포인트를 사용합니다. 베이스 체크포인트는 classifier-free guidance를 적용해 50 스텝으로 실행되며, 파인튜닝할 대상은 바로 이 체크포인트입니다(참조: LoRA 파인튜닝).
pipe = ModularPipeline.from_pretrained("black-forest-labs/flux-3-image-klein-base")
pipe.load_components(dtype={"vae": torch.float32, "default": torch.bfloat16})
pipe.to("cuda")

pipe.guider = pipe.guider.new(guidance_scale=5.0)  # optional
image = pipe(prompt=prompt, output="images")[0]
단일 파일 형식 체크포인트
Black Forest Labs는 또한 트랜스포머를 단일 파일로 제공하며, bf16 그리고 두 가지 양자화 포맷으로 제공됩니다: fp8r (rowwise FP8) 및 nvfp4. 다음 중 하나를 로드하세요 from_single_file그런 다음 나머지 구성 요소는 이름으로 로드하여 bf16 트랜스포머가 함께 다운로드되지 않도록 합니다.
from diffusers import BFLQuantizationConfig, Flux3Transformer2DModel, ModularPipeline

model_id = "black-forest-labs/flux-3-image-klein-base"
variant = "fp8r"  # or "nvfp4"

transformer = Flux3Transformer2DModel.from_single_file(
    f"https://huggingface.co/{model_id}/blob/main/variants/{variant}/model.safetensors",
    config=model_id,
    subfolder="transformer",
    quantization_config=BFLQuantizationConfig(compute_dtype=torch.bfloat16),
    dtype=torch.bfloat16,
)

pipe = ModularPipeline.from_pretrained(model_id)
pipe.load_components(dtype=torch.bfloat16)
pipe.update_components(transformer=transformer)
pipe.to("cuda")
양자화되지 않은 단일 파일의 경우 다음을 사용하십시오. https://huggingface.co/{model_id}/blob/main/model.safetensors 및 드롭 quantization_config.
| 변이 | 빠른 커널 on | 기타 GPU |
|---|---|---|
fp8r |
컴퓨트 능력 8.9+ (Ada, Hopper, Blackwell) | 매 단계마다 가중치가 역양자화됩니다: 메모리는 절약되지만 속도 향상은 없습니다 |
nvfp4 |
블랙웰(Blackwell)은 flashinfer-python 그리고 flashinfer-cubin 동일한 버전에서 |
위와 동일 |
LoRA 파인튜닝
FLUX.3는 text-to-image와 image-to-image 모두에서 작동하므로 커스텀 LoRA의 훌륭한 기반이 됩니다. diffusers 두 작업 모두를 위한 DreamBooth LoRA 학습 스크립트를 제공합니다(다음을 사용하여 학습할 수도 있습니다 Ostris의 AI Toolkit).
타로 카드 스타일을 학습하는 텍스트-이미지(text-to-image) 예시입니다. 다음은 multimodalart/1920-raider-waite-tarot-public-domain 데이터셋, 트리거 조건: trtcrd:
accelerate launch train_dreambooth_lora_flux3_klein.py \
  --pretrained_model_name_or_path="black-forest-labs/flux-3-image-klein-base" \
  --dataset_name="multimodalart/1920-raider-waite-tarot-public-domain" \
  --caption_column="caption" \
  --instance_prompt="trtcrd" \
  --output_dir="trained-flux3-tarot-lora" \
  --mixed_precision="bf16" \
  --resolution=1024 \
  --use_aspect_ratio_buckets \
  --train_batch_size=1 \
  --rank=16 \
  --lora_alpha=16 \
  --learning_rate=1e-4 \
  --lr_scheduler="constant" \
  --max_train_steps=1500 \
  --validation_prompt="a trtcrd of a cat, tarot style" \
  --validation_epochs=25 \
  --seed=0 \
  --push_to_hub
메모리 사용량을 줄이려면 몇 가지 최적화 플래그를 추가하십시오:
  --gradient_checkpointing \
  --cache_latents \
  --use_8bit_adam
--gradient_checkpointing역방향 패스에서 활성화(activations)를 다시 계산합니다(VRAM 사용량은 낮아지고 약간 더 느려집니다),--cache_latents이미지를 사전 인코딩하고 VAE를 해제하며,--use_8bit_adam옵티마이저 상태를 8비트로 유지합니다.
몇 가지 노브를 실험해 볼 가치가 있습니다. 아래 그리드는 동일한 타로 스타일을 서로 다른 LoRA 랭크와 옵티마이저로 학습한 것입니다; 어댑터는 Hub에 있습니다: diffusers-modular/flux3-tarot-lora. 더 많은 학습 기능과 구성은 다음 문서에 설명되어 있습니다: DreamBooth FLUX.3 README.

명령 기반 편집의 경우, image-to-image 스크립트(train_dreambooth_lora_flux3_klein_img2img.py)는 (참조 이미지, 타겟 이미지, 지시문) 삼중항으로 학습하며, 참조 이미지는 프롬프트에서 다음과 같이 지칭된다: <ref_image_0>.
다음을 참조하십시오: DreamBooth FLUX.3 README 모든 옵션과 전체 image-to-image 예제는 해당 링크를 참조하세요.
운영 비용
이 섹션에서는 모델의 메모리 사용량과 생성 속도에 대해 이야기하겠습니다.
메모리
| 이름 | 로드 후 할당된 최대 GiB | 추론 후 피크 할당량 (GiB) |
|---|---|---|
| nvfp4 (RTX6000) | 13.4 | 15.3 |
| fp8r (H100) | 14.35 | 16.27 |
| bf16 (H100) | 18.80 | 20.72 |
메모리가 부족한 경우:
- 로드하십시오 양자화된 트랜스포머.
- 텍스트 인코더를 별도로 실행한 후 메모리에서 해제하십시오. 이는 이미지당 디노이징 전에 한 번만 실행됩니다 (참조: 한 번 인코딩하고 여러 번 생성).
- 자동 CPU 오프로딩을 켜십시오. 이는 각 구성 요소를 실행 중일 때만 GPU로 이동시킵니다 (우리는 이를 벤치마크하지 않았습니다)
from diffusers import ComponentsManager, ModularPipeline

manager = ComponentsManager()
manager.enable_auto_cpu_offload(device="cuda")

pipe = ModularPipeline.from_pretrained("black-forest-labs/flux-3-image-klein", components_manager=manager)
pipe.load_components(dtype={"vae": torch.float32, "default": torch.bfloat16})
# no pipe.to("cuda"): the manager handles device placement
속도
증류된 체크포인트(16 스텝)에 대한 엔드투엔드 실행 시간으로, 워밍업 후 세 번의 실행 평균입니다:
| 워크플로우 | 출력 크기 | 시간 | 피크 메모리 |
|---|---|---|---|
| 텍스트-이미지 | 1024 × 1024 | 1.93 s | 23.8 GiB |
| 이미지 간 변환, 1024 × 1024 참조 이미지 한 장 | 1024 × 1024 | 3.87초 | 23.8 GiB |
| 레이아웃 편집(나이트), 1360 × 768 참조 이미지 1장 | 1360 × 768 | 4.10 s | 23.8 GiB |
NVIDIA H100 80GB 단일 GPU, 오프로딩 없음, 기본 어텐션 백엔드 사용.
참조 이미지는 시간을 약 2배로 늘립니다. 참조 토큰은 텍스트 및 생성 중인 이미지와 동일한 시퀀스에 결합되므로, 1024 × 1024 참조 이미지는 모든 트랜스포머 호출마다 4,096개의 토큰을 추가합니다.
 |
|---|
| 트랜스포머 호출당 토큰 수를 나타내는 누적 막대 그래프: text-to-image 4,256 토큰; image-to-image 8,272; layout text-to-image 4,336; layout image-to-image 8,800 |
아키텍처
모델을 하나씩 조각 내서 열어 살펴봅시다. 이 모델은 세 가지 종류의 토큰을 입력받습니다:
- 텍스트
- 그 노이즈가 있는 이미지 생성되고 있는
- 및 선택 사항인 레퍼런스 이미지
픽셀에서 토큰까지
FLUX.3은 이미지 생성을 위한 잠재 공간(latent-space) 흐름 모델입니다. 이는 디노이저가 잠재값(latents)을 입력으로 받아 잠재값을 출력으로 생성한다는 의미입니다. 우리는 VAE를 사용하여 잠재값을 다시 픽셀로 디코딩합니다. FLUX.3은 Flux.2와 동일한 VAE 아키텍처를 사용합니다.
FLUX.2 VAE는 이미지를 각 방향으로 8× 압축하여 32개 채널로 만들고, 그 잠재 표현의 2 × 2 패치마다 128개 채널을 가진 단일 토큰으로 패킹합니다.
그래서 하나의 토큰이 16 × 16 픽셀 패치를 커버합니다, 그리고 1024 × 1024 이미지는 4,096개 토큰으로 이루어진 64 × 64 그리드가 됩니다. 노이즈가 적용된 이미지는 정확히 그 모양의 무작위 노이즈로 시작합니다. 참조 이미지는 동일한 VAE 인코더와 패킹 과정을 거치며 자체 크기를 유지합니다.
프롬프트에서 토큰까지
텍스트 인코더는 비전-언어 모델인 Qwen3-VL입니다. FLUX.3는 단순히 마지막 층만 가져오지 않습니다. 대신 36개 층 중 여덟 개 전체 36개 층 중에서(4, 8, …, 32층) 은닉 상태를 읽어 쌓으므로, 각 텍스트 토큰은 선형 층이 트랜스포머의 폭인 3072로 투영하기 전에 8 × 2560 = 20,480차원 벡터가 됩니다.
이를 통해 트랜스포머는 최종 층뿐 아니라 언어 모델의 여러 깊이에서 나온 특징을 얻습니다. 프롬프트는 80 토큰의 배수로 패딩되며, 트랜스포머는 패딩에도 어텐션을 수행하기 때문에 파이프라인은 호출당 하나의 프롬프트를 처리합니다.
두 단계
트랜스포머는 토큰을 두 단계로 처리합니다:
- 1단계: 모드별 블록. 각 스트림은 자체 가중치를 가진 5개의 블록을 통과합니다. 텍스트에는 자체 블록이 있고, 노이즈가 낀 이미지에는 자체 블록이 있으며, 참조 이미지에도 자체 블록이 있습니다.
- 2단계: 공동(joint) 블록. 스트림들은 하나의 시퀀스로 연결되어,
[text | image | reference]이 시퀀스는 하나의 가중치 세트를 공유하는 28개의 블록을 통과합니다.
두 단계의 차이는 누가 누구에게 어텐션을 할 수 있는가.
에 있습니다. 1단계에서는 각 스트림이 자기 자신에게만 어텐션하므로, 각 종류의 토큰이 먼저 자기 방식대로 정제됩니다. 2단계에서는 모든 것이 모든 것에게 어텐션하며, 이때 이미지는 텍스트와 참조로부터 학습합니다. 비교하자면, FLUX.2의 double-stream 블록 역시 텍스트와 이미지에 별도의 가중치를 부여하지만 처음부터 서로 어텐션하도록 합니다. FLUX.3은 스트림들을 처음에는 완전히 분리해 두었다가 나중에 병합합니다.
마지막에는 텍스트 토큰과 참조 토큰이 단순히 버려집니다. 이미지 토큰만이 출력 레이어를 통과하며, 출력 레이어는 이미지 토큰을 깨끗한 이미지 쪽으로 한 단계 이동시키는 방법을 예측합니다.
블록 내부
두 단계 중 어느 쪽이든 모든 블록은 동일한 구조를 가집니다. 어텐션과 MLP가 동일한 정규화된 입력에 대해 병렬로 실행되며, 그 합이 잔차 스트림에 다시 더해집니다.
각 블록은 학습된 스케일이나 시프트가 없는 LayerNorm으로 시작합니다. 스케일, 시프트, 게이트는 대신 타임스텝 임베딩에서 나옵니다(이를 modulation이라고 합니다). 어텐션 내부에서는 쿼리와 키가 RMS 정규화되고 회전 위치 임베딩(RoPE)을 받습니다. 이에 대해서는 아래에서 살펴봅니다.
공동 블록에서는 모든 토큰이 동일한 가중치를 공유하지만, 텍스트, 이미지, 참조 토큰은 각각 자체적인 스케일, 시프트, 게이트를 갖습니다.
def block(x, shift, scale, gate):      # shift, scale, gate come from the token's timestep embedding
    h = layer_norm(x)                  # no learned scale or shift
    h = (1 + scale) * h + shift
    q, k, v = to_q(h), to_k(h), to_v(h)
    q, k = rope(rms_norm(q)), rope(rms_norm(k))
    out = attention(q, k, v) + mlp(h)  # parallel, MLP is SwiGLU
    return x + gate * out
모든 토큰은 자신만의 타임스텝을 갖습니다
FLUX.1과 FLUX.2에서는 하나의 타임스텝 임베딩이 모든 토큰을 변조합니다. FLUX.3에서는 변조가 토큰의 종류에 따라 달라집니다.
노이즈가 섞인 이미지 토큰은 현재 타임스텝에 의해 변조됩니다. t. 텍스트(text) 및 레퍼런스(reference) 토큰은 항상 타임스텝(timestep)에 따라 조절됩니다 0, 즉 "깨끗한 것이라 노이즈 제거할 것이 없다"는 의미입니다. 따라서 출력과 거의 동일하게 보이는 참조 자료조차 생성할 대상이 아니라 주어진 맥락으로 표시됩니다.
증류된 체크포인트는 1개의 플로우 맵. 또한 각 단계가 도약하는 타임스텝도 전달받습니다. 그 두 번째 타임스텝은 자체 임베딩을 얻으며, 이 임베딩은 모든 토큰의 변조(modulation)에 더해져서 16개의 각 단계가 더 큰 도약을 할 수 있게 됩니다.
4차원에서의 위치
어텐션만으로는 토큰의 위치를 알 수 없습니다(이 현상을 치환 등변성(permutation equivariance)이라고 합니다). RoPE는 토큰의 위치에 의존하는 양만큼 각 쿼리와 키를 회전시켜 이 문제를 해결합니다. FLUX.3는 4개의 위치 축을 사용하며, (t, h, w, l) (timestep, height, width, length of sequence), 각 축에 128차원 어텐션 헤드의 4분의 1(32차원)을 할당합니다:
| 토큰 | t: timestep | h: height | w: width | l: length of sequence |
|---|---|---|---|---|
| text token i | 0 | 0 | 0 | i |
| image token at (row, col) | 0 | row / 2 | col / 2 | 0 |
| reference k at (row, col) | 0 | row / 2 | col / 2 | −(k + 1) |
텍스트 토큰들은 문장의 단어처럼 l, 문장 속 단어처럼 배열됩니다. 이미지와 레퍼런스는 2D 격자이며 (h, w)안의 2차원 격자이며, 서로 구분되는 방향은 l. 참조(reference)는 출력과 동일한 (h, w) 좌표를 사용하기 때문에, "참조에서의 같은 위치"가 모델에게 정확한 의미를 갖으며, 이것이 바로 src_bbox / tgt_bbox 편집이 의존하는 부분입니다.
디노이징 루프
FLUX.3는 플로우 매칭(flow-matching) 모델입니다. 생성은 순수한 노이즈에서 시작되며, 50단계 각 단계마다 트랜스포머가 velocity를 예측합니다. 이는 노이즈에서 깨끗한 이미지를 향하는 방향입니다. 스케줄러는 그 방향을 따라 한 단계 나아갑니다.
모든 단계에서 모델의 최종 이미지에 대한 현재 추정값을 읽어낼 수도 있습니다. 몇 단계에서 그 추정값을 디코딩하면 이미지가 어떻게 형태를 갖춰가는지 볼 수 있습니다:
 |
 |
||||
|---|---|---|---|---|---|
| 1단계 | 5단계 | 10단계 | 15단계 | 25단계 | 50단계 |
여우, 그 자세, 그리고 빛은 노이즈 수준이 아직 0.97인 상태에서 이미 10단계까지에 자리를 잡습니다. 눈이 쌓인 가지와 털의 질감은 마지막 몇 단계에서만 나타납니다. FLUX.3의 스케줄러는 큰 타임 시프트(6.93)를 사용하며, 이는 실행 대부분 동안 노이즈 수준을 높게 유지합니다. 50단계 중 44단계가 σ = 0.5 이상에서 일어납니다. 우리는 파이프라인에 작은 블록 하나를 추가하여 이 그림을 만들었고, 이것이 바로 우리를 Modular Diffusers로 이끕니다.
플로우 매칭이 처음이라면, 작동 방식을 이해하실 수 있도록 초보자 친화적 튜토리얼 과 비디오 를 준비했습니다.
모듈형 Diffusers
FLUX.3는 모듈형 Diffusers 파이프라인으로 제공됩니다.
워크플로 보기
가중치를 전혀 로드하지 않고도 워크플로를 나열하고 각 워크플로의 정확한 블록을 출력할 수 있습니다.
from diffusers import Flux3AutoBlocks

blocks = Flux3AutoBlocks()
print(blocks.available_workflows)
# ['text2image', 'image_conditioned']

print(list(blocks.get_workflow("text2image").sub_blocks))
# ['text_encoder', 'denoise.input', 'denoise.prepare_latents', 'denoise.set_timesteps',
#  'denoise.prepare_rope_inputs', 'denoise.denoise', 'denoise.after_denoise', 'decode']
get_workflow() auto 브랜치를 해석하여 실제로 실행될 단계의 순서를 그대로 보여줍니다. print(blocks.get_workflow("image_conditioned").doc) 해당 워크플로의 구성 요소, 입력, 기본값, 출력을 출력합니다.
한 번 인코딩하고, 여러 번 생성
텍스트 인코더를 꺼내 프롬프트를 한 번만 인코딩한 뒤, 메모리에서 해제하고 캐시된 임베딩으로 생성하세요.
import torch
from diffusers import ModularPipeline

model_id = "black-forest-labs/flux-3-image-klein-base"

blocks = ModularPipeline.from_pretrained(model_id).blocks
text_blocks = blocks.sub_blocks.pop("text_encoder")  # `blocks` now starts at the VAE encoder

text_pipe = text_blocks.init_pipeline(model_id)
text_pipe.load_components(dtype=torch.bfloat16)
text_pipe.to("cuda")

state = text_pipe(prompt=prompt, negative_prompt="")  # no guider here, so ask for the negative embeddings

prompt_embeds = state.get("prompt_embeds")
negative_prompt_embeds = state.get("negative_prompt_embeds")

del text_pipe
torch.cuda.empty_cache()

image_pipe = blocks.init_pipeline(model_id)  # no text encoder to load
image_pipe.load_components(dtype={"vae": torch.float32, "default": torch.bfloat16})
image_pipe.to("cuda")

for seed in range(3):
    image = image_pipe(
        prompt_embeds=prompt_embeds,
        negative_prompt_embeds=negative_prompt_embeds,
        generator=torch.Generator().manual_seed(seed),
        output="images",
    )[0]
    image.save(f"{seed}.png")
루프 안에 스텝 추가
위의 디노이징 그림은 매 스텝마다 모델이 추정한 깨끗한 이미지를 기록하는 하나의 추가 블록에서 나온 것입니다:
from diffusers.modular_pipelines import Flux3AutoBlocks, InputParam, ModularPipelineBlocks, OutputParam


class Flux3PreviewStep(ModularPipelineBlocks):
    model_name = "flux3"

    @property
    def inputs(self):
        return [InputParam("latents"), InputParam("noise_pred")]

    @property
    def intermediate_outputs(self):
        return [OutputParam("x0_previews", type_hint=list)]

    @torch.no_grad()
    def __call__(self, components, block_state, i, t):
        if i == 0:
            block_state.x0_previews = []
        sigma = t / 1000  # timesteps are sigmas scaled to [0, 1000]
        block_state.x0_previews.append(block_state.latents - sigma * block_state.noise_pred)  # x0 = x_t - sigma * v
        return components, block_state


blocks = Flux3AutoBlocks()
denoise_loop = blocks.sub_blocks["denoise"].sub_blocks["text2image"].sub_blocks["denoise"]
denoise_loop.sub_blocks.insert("preview", Flux3PreviewStep(), 1)  # between "denoiser" and "after_denoiser"

pipe = blocks.init_pipeline(model_id)
pipe.load_components(dtype={"vae": torch.float32, "default": torch.bfloat16})
pipe.to("cuda")

out = pipe(prompt=prompt, generator=torch.Generator().manual_seed(0), output=["x0_previews", "images"])
사용해 보기
- 모델: FLUX.3 Image Klein 컬렉션
- 문서: Diffusers의 FLUX.3
- 파인튜닝: DreamBooth LoRA 스크립트
- 프롬프팅: Black Forest Labs 프롬프팅 가이드
FLUX.3로 무언가를 만드셨나요? 허브에 LoRA와 파이프라인을 공유해 주세요. 여러분의 작품을 보고 싶습니다! 😎