
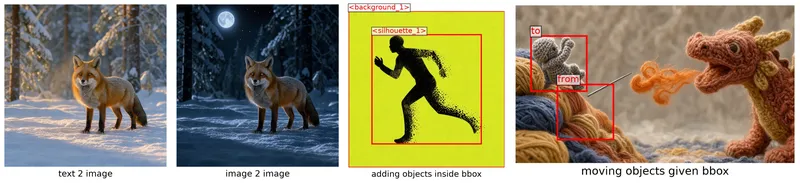
Black Forest Labs FLUX.3 Image Klein 来了,并且从第一天起就可以在 Diffusers 中运行。一个模型同时支持文本生成图像和多参考图像生成图像,还带来了新功能—— 布局控制。你可以在提示词中写入边界框,指定图像的各个部分应该放在哪里,或者移动参考图像的哪些部分。
两个开放权重都已收录在 FLUX.3 Image Klein 合集:
| 检查点 | 说明 | 默认参数 |
|---|---|---|
black-forest-labs/flux-3-image-klein |
时间步蒸馏版,用于快速推理 | 16 步,无 CFG |
black-forest-labs/flux-3-image-klein-base |
基础模型 | 50 步,CFG |

你现在就可以前往 Hugging Face 空间 立即生成一些图片!
TL;DR
- 一个模型搞定文本生成图像、多参考图像生成图像以及边界框布局控制。
- 蒸馏检查点在 H100 上生成一张 1024 × 1024 图像大约只需 2 秒 在 H100 上。
- NVFP4 和 FP8 权重可通过
from_single_file加载,适用于显存更小的 GPU。 - 提供文本生成图像和图像编辑的 LoRA 训练脚本。
- 以 Modular Diffusers 流水线的形式发布,因此你可以移除模块或添加自己的模块。
目录
入门指南
安装最新版本 diffusers 以及 transformers (用于 Qwen3-VL 文本编码器):
pip install -U diffusers transformers
加载蒸馏后的检查点并生成图像:
import torch
from diffusers import ModularPipeline

pipe = ModularPipeline.from_pretrained("black-forest-labs/flux-3-image-klein")
pipe.load_components(dtype=torch.bfloat16)
pipe.to("cuda")

pipe(prompt="a red fox", output="images")[0].save("fox.png")
FLUX.3 能做什么
文本生成图像
FLUX.3 对包含主体、场景、光线、构图和风格的完整场景描述反应最佳。The 官方提示指南 来自Black Forest Labs的有更多提示。该蒸馏检查点生成一个 1024 × 1024 图片位于 16 个步骤。传递 height, width或 num_inference_steps 来更改它们。
prompt = (
    "A wide-angle wildlife photograph of a red fox standing alert in a snow-covered forest clearing at golden hour. "
    "The fox is centered in the frame, its thick orange winter coat contrasting with the fresh white snow, breath "
    "visible in the cold air. Snow-laden pine trees fill the softly blurred background, and low warm sunlight rakes "
    "across the scene from the left, casting long blue shadows."
)

fox = pipe(
    prompt=prompt,
    generator=torch.Generator().manual_seed(0),
    output="images"
)[0]
fox.save("fox.png")
 |
|---|
| 文本生成图像 |
图像到图像
传入一张或多张参考图像,并使用 image 论点。请将该提示词写成你所用的图片的说明文字 想要,包括该变更在内。
prompt = (
    "The same red fox in the same snow-covered forest clearing, now at night under a full moon: cool blue "
    "moonlight, deep shadows, stars visible through the pine branches, the fox's eyes catching the light."
)
night = pipe(
    prompt=prompt,
    image=fox, # from the previous text to image example
    generator=torch.Generator().manual_seed(0),
    output="images",
)[0]
night.save("night.png")
 |
|---|
| 图生图 |
通过几条参考信息,在提示中这样引用它们: <ref_image_0>, <ref_image_1>,……按照它们被传入的顺序 image:
red_fox = pipe(prompt="a red fox", generator=torch.Generator().manual_seed(0), output="images")[0]
bench = pipe(prompt="a wooden bench", generator=torch.Generator().manual_seed(0), output="images")[0]

combined = pipe(
    prompt="The fox from <ref_image_0> sitting on the wooden bench from <ref_image_1> in a snowy setting.",
    image=[red_fox, bench],
    output="images",
)[0]

combined.save("combined.png")
 |
 |
 |
|---|---|---|
<ref_image_0>:一只赤狐 |
<ref_image_1>:一张木质长椅 |
长椅上的狐狸 |
布局控制
在标题后添加一个JSON格式的地区列表。每个地区包含一个 id,一个 bbox,以及一 desc,并且说明文字中将其称为 <id>.
盒子写作形式如下
[y_min, x_min, y_max, x_max], y 第一次,采用0–1000的量表。由于该量表经过归一化,同一个框适用于任何图像尺寸。
在新图像中放置区域
layout_prompt = (
    "Minimalist graphic illustration featuring a black silhouette of a person <silhouette_1> centered against a "
    "solid, vibrant chartreuse background <background_1>. The figure is captured in a dynamic, mid-stride running "
    "pose, facing toward the left side of the frame. "
    '[{"id": "background_1", "bbox": [0, 0, 1000, 1000], "desc": "A flat field of neon yellow-green with a subtle '
    'paper texture and fine, organic grain."}, {"id": "silhouette_1", "bbox": [150, 150, 850, 850], "desc": "A '
    "black silhouette of a person in motion, made of dense stippled ink. The leading edges are solid; the trailing "
    'arm and leg dissolve into coarse square pixels and scattered dots."}]'
)

runner = pipe(prompt=layout_prompt, generator=torch.Generator().manual_seed(0), output="images")[0]
 |
|---|
每个区域的 desc 被绘制在其 bbox |
在参考图像内移动区域
关于编辑,每个区域都说明其内容来自何处。 来自 (src_bbox 在参考文献中)以及它去向(tgt_bbox (输出中)。包含相同两个方框的区域保持原位。
此示例将针织骑士向上和向左移动,并固定背景、悬崖、针、龙和火焰:
from diffusers.utils import load_image

knight_image = load_image("knight_orig.png")
edit_prompt = (
    "In <ref_image_0>, move the miniature grey amigurumi knight figure <knight_1> upwards and to the left along the "
    "yarn cliff <cliff_1>. Keep the rest of the image completely unchanged, preserving the blurred yarn backdrop "
    "<backdrop_1>, the large knitted dragon <dragon_1>, and the fiery orange thread <fire_1>. "
    '[{"id": "knight_1", "from": "ref_image_0", "src_bbox": [500, 150, 850, 350], "tgt_bbox": [194, 55, 544, 255], '
    '"desc": "A miniature amigurumi knight crocheted from thick grey woolen yarn."}, '
    '{"id": "backdrop_1", "from": "ref_image_0", "src_bbox": [0, 0, 1000, 1000], "tgt_bbox": [0, 0, 1000, 1000], '
    '"desc": "A soft, out-of-focus backdrop of cream and indigo knitted yarn."}, '
    '{"id": "cliff_1", "from": "ref_image_0", "src_bbox": [300, 0, 1000, 450], "tgt_bbox": [300, 0, 1000, 450], '
    '"desc": "A steep cliff of stacked yarn skeins in mustard, terracotta, and indigo."}, '
    '{"id": "needle_1", "from": "ref_image_0", "src_bbox": [420, 250, 550, 450], "tgt_bbox": [420, 250, 550, 450], '
    '"desc": "An oversized polished steel tapestry needle."}, '
    '{"id": "dragon_1", "from": "ref_image_0", "src_bbox": [100, 600, 950, 1000], "tgt_bbox": [100, 600, 950, 1000], '
    '"desc": "A large, fluffy knitted dragon in terracotta and mustard yarn."}, '
    '{"id": "fire_1", "from": "ref_image_0", "src_bbox": [350, 400, 650, 650], "tgt_bbox": [350, 400, 650, 650], '
    '"desc": "Curled puffs of fiery orange angora thread suspended in mid-air."}]'
)

moved = pipe(prompt=edit_prompt, image=knight_image, generator=torch.Generator().manual_seed(0), output="images")[0]
 |
|---|
马从其 src_bbox 对其 tgt_bbox, 场景的其余部分保持不变 |
基础模型与量化变体
基础模型
以上所有内容均使用蒸馏后的检查点。基础检查点运行50步并使用无分类器引导,它是用于微调的那个(参见 LoRA 微调).
pipe = ModularPipeline.from_pretrained("black-forest-labs/flux-3-image-klein-base")
pipe.load_components(dtype={"vae": torch.float32, "default": torch.bfloat16})
pipe.to("cuda")

pipe.guider = pipe.guider.new(guidance_scale=5.0)  # optional
image = pipe(prompt=prompt, output="images")[0]
单文件格式检查点
Black Forest Labs 还将该 transformer 以单个文件的形式发布,格式为 bf16 以及两种量化格式: fp8r (逐行 FP8)和 nvfp4。加载其中任意一个,方法是使用 from_single_file,然后按名称加载其他组件,这样就不会下载 bf16 transformer。
from diffusers import BFLQuantizationConfig, Flux3Transformer2DModel, ModularPipeline

model_id = "black-forest-labs/flux-3-image-klein-base"
variant = "fp8r"  # or "nvfp4"

transformer = Flux3Transformer2DModel.from_single_file(
    f"https://huggingface.co/{model_id}/blob/main/variants/{variant}/model.safetensors",
    config=model_id,
    subfolder="transformer",
    quantization_config=BFLQuantizationConfig(compute_dtype=torch.bfloat16),
    dtype=torch.bfloat16,
)

pipe = ModularPipeline.from_pretrained(model_id)
pipe.load_components(dtype=torch.bfloat16)
pipe.update_components(transformer=transformer)
pipe.to("cuda")
对于未量化的单个文件,请使用 https://huggingface.co/{model_id}/blob/main/model.safetensors 并放下 quantization_config.
| 变体 | 快速内核在 | 其他GPU |
|---|---|---|
fp8r |
计算能力 8.9+(Ada、Hopper、Blackwell) | 权重在每一步都被反量化:降低内存,但无速度提升 |
nvfp4 |
Blackwell,支持 flashinfer-python 和 flashinfer-cubin 在同一版本下 |
同上 |
LoRA 微调
FLUX.3 同时支持文生图和图生图,这使它成为自定义 LoRA 的绝佳基础。 diffusers 为这两项任务提供了 DreamBooth LoRA 训练脚本(你也可以使用 Ostris 的 AI Toolkit).
下面是一个文生图示例,它从 multimodalart/1920-raider-waite-tarot-public-domain 数据集中学习塔罗牌风格,触发词为 trtcrd:
accelerate launch train_dreambooth_lora_flux3_klein.py \
  --pretrained_model_name_or_path="black-forest-labs/flux-3-image-klein-base" \
  --dataset_name="multimodalart/1920-raider-waite-tarot-public-domain" \
  --caption_column="caption" \
  --instance_prompt="trtcrd" \
  --output_dir="trained-flux3-tarot-lora" \
  --mixed_precision="bf16" \
  --resolution=1024 \
  --use_aspect_ratio_buckets \
  --train_batch_size=1 \
  --rank=16 \
  --lora_alpha=16 \
  --learning_rate=1e-4 \
  --lr_scheduler="constant" \
  --max_train_steps=1500 \
  --validation_prompt="a trtcrd of a cat, tarot style" \
  --validation_epochs=25 \
  --seed=0 \
  --push_to_hub
为了减少内存占用,可以添加几个优化标志:
  --gradient_checkpointing \
  --cache_latents \
  --use_8bit_adam
--gradient_checkpointing在反向传播中重新计算激活值(显存更低,速度稍慢),--cache_latents预先编码图像并释放 VAE,而--use_8bit_adam则将优化器状态保持在 8-bit。
有几个参数值得试验。下方的网格使用不同的 LoRA rank 和优化器训练同样的塔罗牌风格;这些适配器托管在 Hub 上: diffusers-modular/flux3-tarot-lora。更多训练功能和配置记录在 DreamBooth FLUX.3 README.

中。对于基于指令的编辑,图生图脚本(train_dreambooth_lora_flux3_klein_img2img.py)在(参考图像,目标图像,指令)三元组上进行训练,其中参考图像在提示词中以 <ref_image_0>.
方式引用。请参阅 DreamBooth FLUX.3 README 了解所有选项以及完整的图生图示例。
运行成本
在本节中,我们将讨论这些模型的内存消耗和生成速度。
内存
| 名称 | 加载后峰值分配(GiB) | 推理后峰值分配(GiB) |
|---|---|---|
| nvfp4(RTX6000) | 13.4 | 15.3 |
| fp8r(H100) | 14.35 | 16.27 |
| bf16(H100) | 18.80 | 20.72 |
如果你的内存较少:
- 加载一个 量化 transformer.
- 单独运行文本编码器然后释放它。它每张图像只运行一次,在去噪之前(参见 编码一次,生成多张).
- 开启自动 CPU 卸载(automatic CPU offloading),它只在组件运行时将其移到 GPU 上(我们没有对此进行基准测试)
from diffusers import ComponentsManager, ModularPipeline

manager = ComponentsManager()
manager.enable_auto_cpu_offload(device="cuda")

pipe = ModularPipeline.from_pretrained("black-forest-labs/flux-3-image-klein", components_manager=manager)
pipe.load_components(dtype={"vae": torch.float32, "default": torch.bfloat16})
# no pipe.to("cuda"): the manager handles device placement
速度
蒸馏检查点(16 步)的端到端耗时,在预热后取三次运行的平均值:
| 工作流 | 输出尺寸 | 时间 | 峰值内存 |
|---|---|---|---|
| 文本生成图像 | 1024 × 1024 | 1.93 s | 23.8 GiB |
| 图像到图像,一张 1024 × 1024 参考图 | 1024 × 1024 | 3.87 秒 | 23.8 GiB |
| 布局编辑(骑士),1360 × 768 参考图一份 | 1360 × 768 | 4.10 秒 | 23.8 GiB |
单张 NVIDIA H100 80GB,无卸载(offloading),默认注意力后端。
一张参考图像大约会使时间翻倍。参考标记与文本和正在生成的图像加入同一序列,因此一张 1024 × 1024 的参考图像会为每次 transformer 调用增加 4,096 个标记
 |
|---|
| 每次 transformer 调用的 token 数量堆叠条形图:文生图 4,256 个 token;图生图 8,272 个;布局文生图 4,336 个;布局图生图 8,800 个 |
架构
让我们逐个部分地拆解这个模型。该模型接受三种token:
- 文本
- 这个 噪声图像 正在生成的
- 以及可选的 参考图像
从像素到 token
FLUX.3 是一个用于图像生成的潜空间流模型。这意味着去噪器以潜变量为输入并输出潜变量。我们使用 VAE 将潜变量解码回像素。FLUX.3 使用与 Flux.2 相同的 VAE 架构。
FLUX.2 的 VAE 将图像在每个方向上压缩 8 倍至 32 个通道,然后将该潜变量的每个 2 × 2 块打包成一个具有 128 个通道的单一 token。
因此 一个 token 覆盖一个 16 × 16 像素的块,一张 1024 × 1024 的图像变成一个由 4,096 个 token 组成的 64 × 64 网格。噪声图像以完全相同形状的随机噪声开始。参考图像经过相同的 VAE 编码器和打包过程,并保持其自身的大小。
从提示词到 token
文本编码器是 Qwen3-VL,一个视觉语言模型。FLUX.3 并不只是取其最后一层。它读取其 36 层中 八 从其 36 层中提取(第 4、8、…、32 层)的隐藏状态并将它们堆叠起来,因此每个文本 token 在经过一个线性层投影到 transformer 的 3072 宽度之前,会变成一个 8 × 2560 = 20,480 维的向量。
这为 transformer 提供了来自语言模型多个深度层次的特征,而不仅仅是其最终层。提示词会被填充到 80 个 token 的倍数,且 transformer 也会关注填充部分,这就是为什么该流水线每次调用只接受一个提示词。
两个阶段
transformer 分两个阶段处理这些 token:
- 阶段 1:按模式划分的块。 每条数据流经过5个带有各自权重的块。文本有自己独立的块,噪声图像有自己独立的块,参考图像也有自己独立的块。
- 阶段2:联合块。 各数据流被拼接成一个序列,
[text | image | reference]该序列经过28个共享同一组权重的块。
两个阶段的不同之处在于 谁可以关注谁.
在阶段1中,每条数据流只关注自身,因此每种类型的token先按自己的方式被精炼。在阶段2中,所有内容相互关注,图像从文本和参考中学习。作为对比,FLUX.2的双流块也给文本和图像分别设置了权重,但让它们从一开始就相互关注。FLUX.3则先让各数据流完全分离,然后再将它们合并。
最后,文本和参考token被直接丢弃。只有图像token经过输出层,输出层预测如何将它们向干净图像推进一步。
块内部结构
无论处于哪个阶段,每个块都具有相同的结构。注意力和MLP 并行 运行在同一个归一化输入上,它们的和被加回残差流中。
每个块以一个自身没有可学习缩放或偏移的LayerNorm开始。缩放、偏移和门控来自时间步嵌入(这被称为 modulation)。在注意力内部,查询和键经过RMS归一化,并获得旋转位置嵌入(RoPE),我们将在下文介绍。
在联合块中,所有 token 共享相同的权重,但文本、图像和参考 token 各自拥有自己的缩放、偏移和门控。
def block(x, shift, scale, gate):      # shift, scale, gate come from the token's timestep embedding
    h = layer_norm(x)                  # no learned scale or shift
    h = (1 + scale) * h + shift
    q, k, v = to_q(h), to_k(h), to_v(h)
    q, k = rope(rms_norm(q)), rope(rms_norm(k))
    out = attention(q, k, v) + mlp(h)  # parallel, MLP is SwiGLU
    return x + gate * out
每个 token 都有自己的时间步
在 FLUX.1 和 FLUX.2 中,一个时间步嵌入调制所有 token。在 FLUX.3 中,调制取决于 token 的类型。
带噪图像 token 由当前时间步调制 t。而文本和参考 token 始终由时间步 0调制,该时间步意味着“干净,这里没有需要去噪的东西”。因此,即使某个参考图像看起来与输出几乎相同,它也被标记为给定上下文,而不是待生成的内容。
蒸馏后的检查点是一个 流映射。它还会被告知每一步跳转到的时间步。这第二个时间步拥有自己的嵌入,该嵌入被加到每个 token 的调制中,因此其 16 步中的每一步都能实现更大的跳变。
四维空间中的位置
注意力本身并不知道 token 位于何处(这种现象称为置换等变性)。RoPE 通过根据 token 的位置旋转每个 query 和 key 来解决这个问题。FLUX.3 使用四个位置轴, (t, h, w, l) (时间步、高度、宽度、序列长度),并为每个轴分配每个 128 维注意力头的四分之一(32 维):
| Token | t: 时间步 | h: 高度 | w: 宽度 | l: 序列长度 |
|---|---|---|---|---|
| 文本 token i | 0 | 0 | 0 | i |
| 位于 (row, col) 的图像 token | 0 | row / 2 | col / 2 | 0 |
| 参考 k 位于 (row, col) | 0 | row / 2 | col / 2 | −(k + 1) |
文本 token 沿 l,就像句子中的单词一样。图像和参考图像是二维(2D)网格,位于 (h, w)中的 2D 网格,彼此沿 l。因为一个引用使用相同的 (h, w) 坐标作为输出时,"参考图中的同一位置"对模型而言具有精确的含义,这正是 src_bbox / tgt_bbox 所依赖的编辑功能。
去噪循环
FLUX.3 是一个流匹配模型。生成从纯噪声开始,在 50 步中的每一步,transformer 都会预测一个 速度。这是从噪声指向清晰图像的方向。调度器沿着该方向前进一步。
在每一步,你还可以读出模型对最终图像的当前猜测。在若干步骤处对该猜测进行解码,可以展示图像是如何成形的:
 |
 |
||||
|---|---|---|---|---|---|
| 第 1 步 | 第 5 步 | 第 10 步 | 第 15 步 | 第 25 步 | 第 50 步 |
狐狸、它的姿态以及光线在第 10 步时就已经就位,而此时噪声水平仍为 0.97。积雪的树枝和毛发的纹理只在最后几步才出现。FLUX.3 的调度器使用了较大的时间偏移(6.93),这使得噪声水平在大部分运行过程中保持较高:50 步中有 44 步发生在 σ = 0.5 以上。我们通过向 pipeline 中添加一个小模块构建了这张图,这就引出了 Modular Diffusers。
如果你刚开始接触 flow matching,我们为初学者准备了一个 友好的教程 以及一个 视频 帮助你理解它的工作原理。
模块化 Diffusers
FLUX.3 以 Modular Diffusers 流水线的形式发布。
查看工作流
你可以列出各个工作流,并打印每个工作流的确切块,而无需加载任何权重。
from diffusers import Flux3AutoBlocks

blocks = Flux3AutoBlocks()
print(blocks.available_workflows)
# ['text2image', 'image_conditioned']

print(list(blocks.get_workflow("text2image").sub_blocks))
# ['text_encoder', 'denoise.input', 'denoise.prepare_latents', 'denoise.set_timesteps',
#  'denoise.prepare_rope_inputs', 'denoise.denoise', 'denoise.after_denoise', 'decode']
get_workflow() 会解析 auto 分支,并给出将要运行的简单步骤序列。 print(blocks.get_workflow("image_conditioned").doc) 会打印该工作流的组件、输入、默认值和输出。
一次编码,多次生成
把文本编码器取出,对提示词只编码一次,释放它,然后从缓存的嵌入中生成。
import torch
from diffusers import ModularPipeline

model_id = "black-forest-labs/flux-3-image-klein-base"

blocks = ModularPipeline.from_pretrained(model_id).blocks
text_blocks = blocks.sub_blocks.pop("text_encoder")  # `blocks` now starts at the VAE encoder

text_pipe = text_blocks.init_pipeline(model_id)
text_pipe.load_components(dtype=torch.bfloat16)
text_pipe.to("cuda")

state = text_pipe(prompt=prompt, negative_prompt="")  # no guider here, so ask for the negative embeddings

prompt_embeds = state.get("prompt_embeds")
negative_prompt_embeds = state.get("negative_prompt_embeds")

del text_pipe
torch.cuda.empty_cache()

image_pipe = blocks.init_pipeline(model_id)  # no text encoder to load
image_pipe.load_components(dtype={"vae": torch.float32, "default": torch.bfloat16})
image_pipe.to("cuda")

for seed in range(3):
    image = image_pipe(
        prompt_embeds=prompt_embeds,
        negative_prompt_embeds=negative_prompt_embeds,
        generator=torch.Generator().manual_seed(seed),
        output="images",
    )[0]
    image.save(f"{seed}.png")
在循环中添加一个步骤
上面的去噪图来自一个额外的块,它记录模型在每一步对干净图像的猜测:
from diffusers.modular_pipelines import Flux3AutoBlocks, InputParam, ModularPipelineBlocks, OutputParam


class Flux3PreviewStep(ModularPipelineBlocks):
    model_name = "flux3"

    @property
    def inputs(self):
        return [InputParam("latents"), InputParam("noise_pred")]

    @property
    def intermediate_outputs(self):
        return [OutputParam("x0_previews", type_hint=list)]

    @torch.no_grad()
    def __call__(self, components, block_state, i, t):
        if i == 0:
            block_state.x0_previews = []
        sigma = t / 1000  # timesteps are sigmas scaled to [0, 1000]
        block_state.x0_previews.append(block_state.latents - sigma * block_state.noise_pred)  # x0 = x_t - sigma * v
        return components, block_state


blocks = Flux3AutoBlocks()
denoise_loop = blocks.sub_blocks["denoise"].sub_blocks["text2image"].sub_blocks["denoise"]
denoise_loop.sub_blocks.insert("preview", Flux3PreviewStep(), 1)  # between "denoiser" and "after_denoiser"

pipe = blocks.init_pipeline(model_id)
pipe.load_components(dtype={"vae": torch.float32, "default": torch.bfloat16})
pipe.to("cuda")

out = pipe(prompt=prompt, generator=torch.Generator().manual_seed(0), output=["x0_previews", "images"])
试试吧
- 模型: FLUX.3 Image Klein 系列
- 文档: Diffusers 中的 FLUX.3
- 微调: DreamBooth LoRA 脚本
- 提示词: Black Forest Labs 提示词指南
用 FLUX.3 构建了什么?请在 Hub 上分享你的 LoRA 和流水线。我们很乐意看到它们!😎